Multi-line, wrapped text on a Control Page
Posted: Thu Mar 19, 2015 9:09 pm
Hopefully, the new Indigo Touch 2.0 update will include a new text item that will allow multi-line, wrapped text to be included on Control Pages. Until then, here's one way to skin that cat. It's by no means perfect for every use case, but it works for my latest project. Maybe someone else will find it useful as well.
Background:
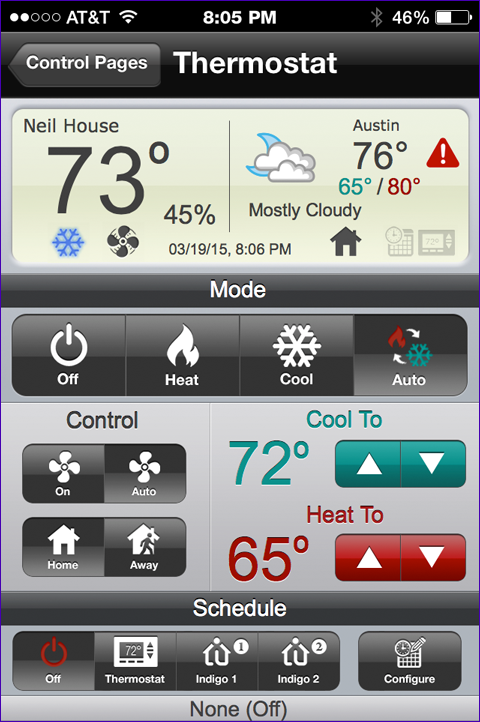
I've been working on a new thermostat Control Page. Along the way, I decided to incorporate the current weather conditions (obtained using the excellent WUnderground Plugin) in the display area at the top. I also wanted to see and review any pending Severe Weather Alerts issued for my area. The WUnderground Plugin includes up to four pending Severe Weather Alerts with each download, and each Alert includes a full (and often lengthy) description.
If there are any Alerts pending, a small Alert icon appears in the upper right corner of the display area, right next to the current weather conditions:

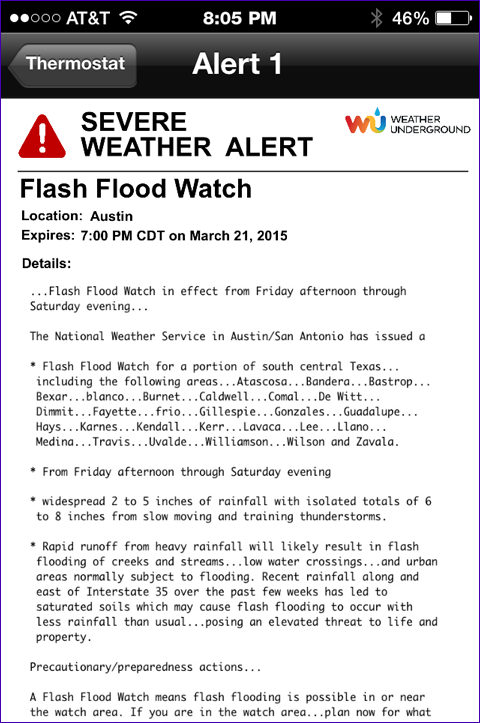
Tapping the alert icon switches to another Control Page showing the details of the first pending Alert:

If there is a second pending Alert, a small button appears in the upper right corner of the first Alert page. Tapping that button advances to an identical Alert page displaying the second Alert. And so on, up to four Alerts.
In order to include the full Alert Descriptions on each Alert Control Page, I use an AppleScript which converts the Alert description text to a PDF, and then converts the PDF to an image file. The Control Page includes a large Refreshing Image URL item. The URL points to the local image file created on the fly by the AppleScript when the Alert Control Page is initially displayed.
There are, of course, a few potential gotchas:
Background:
I've been working on a new thermostat Control Page. Along the way, I decided to incorporate the current weather conditions (obtained using the excellent WUnderground Plugin) in the display area at the top. I also wanted to see and review any pending Severe Weather Alerts issued for my area. The WUnderground Plugin includes up to four pending Severe Weather Alerts with each download, and each Alert includes a full (and often lengthy) description.
If there are any Alerts pending, a small Alert icon appears in the upper right corner of the display area, right next to the current weather conditions:

Tapping the alert icon switches to another Control Page showing the details of the first pending Alert:

If there is a second pending Alert, a small button appears in the upper right corner of the first Alert page. Tapping that button advances to an identical Alert page displaying the second Alert. And so on, up to four Alerts.
In order to include the full Alert Descriptions on each Alert Control Page, I use an AppleScript which converts the Alert description text to a PDF, and then converts the PDF to an image file. The Control Page includes a large Refreshing Image URL item. The URL points to the local image file created on the fly by the AppleScript when the Alert Control Page is initially displayed.
Code: Select all
-- the "watched" folder into which the Alert text files are created by a script on the Indigo Server, triggering the Launch Agent to run this script
set sourceFolder to ((path to documents folder) as text) & "Wunderground Alert Files:"

-- the destination folder where the converted PNG fill will be saved
set destFolder to ((path to library folder) as text) & "Application Support:Perceptive Automation:Indigo 6:IndigoWebServer:images:"

-- temporary folder in which to save the intermediate PDF
set tempFolder to (path to temporary items folder) as text

-- get a list of Alert Text files to be converted
set theseItems to {}
try
	set theseItems to paragraphs of (do shell script "ls " & (tEsc(sourceFolder) & "*.txt"))
end try

-- iterate through he list
repeat with textFile in theseItems
	try
		-- get the name of this text file; we'll use it as the name of the output PNG file as well
		set textFileQuotedPath to the quoted form of textFile
		set fileName to do shell script ("basename " & textFileQuotedPath & " '.txt'")

		-- save the intermediate PDF file to a temporary folder
		set thePDFFile to tempFolder & "temp.pdf"
		set pdfFileQuotedPath to the quoted form of the POSIX path of thePDFFile

		--set the font size and line spacing
		set fScale to 1
		set fh to 8.5
		set fh to fh * fScale
		set fw to 8
		set fw to fw * fScale
		set ls to 3.0

		--set the page margins; set the left margin so that when the Image Events crops the image from the center, the text fills the image
		set lm to 140
		set rm to 5
		set tm to 5
		set bm to 5

		--set the page orientation
		--set po to "r" -- landscape
		set po to "R" -- portrait

		-- convert the text file to a PDF
		set theCommand to "cat " & textFileQuotedPath & "  | enscript -fMonaco" & fw & "/" & fh & " -" & po & "lqs" & ls & " --non-printable-format=space --margins=" & lm & ":" & rm & ":" & tm & ":" & bm & " -o - | pstopdf -i -o " & pdfFileQuotedPath
		set shellResult to do shell script theCommand

		-- delete the text file from the "watched" folder
		do shell script "rm " & textFileQuotedPath

		-- convert the PDF to a png and crop it so that it will fill the designated space on the Control Page
		set hCrop to 0.4

		-- update the Indigo variable used to display the "Refresh" button and the "Refreshing…" message on the Alerts Control Page(s)
		tell application "IndigoServer" to set the value of variable "w_alertsActive" to "2"

		set the thePNGFile to destFolder & fileName & ".png"
		set the theJPGFile to tempFolder & fileName & ".jpg"
		tell application "Image Events"
			-- start the Image Events application
			launch
			-- open the PDF file
			set this_image to open thePDFFile

			-- get dimensions of the image
			copy dimensions of this_image to {W, H}

			-- crop it
			crop this_image to dimensions {W - (W * hCrop), H}

			-- save it as a JPG to ensure the image has an opaque white background
			save this_image as JPEG in theJPGFile with icon

			-- close it
			close this_image

			-- open the JPEG file
			set this_image to open theJPGFile

			-- save it as a PNG (the Refreshing Image URL item on the control page will point to this file)
			save this_image as PNG in thePNGFile with icon

			-- close it
			close this_image
		end tell

	on error errMsg number errNum
		set fullErrMsg to errMsg & " [" & (errNum as text) & "]."
	end try
end repeat

-- delete any invisible files (prevents this script from being invoked unnecessarily -- launchd will invoke this script repeatedly as long as there are ANY files in the folder, including hidden files)
try
	set theCommand to "rm -f " & tEsc(sourceFolder) & ".*"
	set ignoreThis to do shell script theCommand
end try


on tEsc(inputString)
	-- Terminal Escape; return a path string that is "escaped" for use Terminal.app
	-- Useful for creating path strings to which glob characters can be appended for use with 'do shell script'
	set {TID, AppleScript's text item delimiters} to {AppleScript's text item delimiters, ""}
	try
		set inputString to the POSIX path of inputString
		--the list of characters to be escaped; the backslash character must be first
		--this list was compiled via LIMITED trial and error; may need to be updated.
		set charsToEscape to "\\ ~`!#$%&*()=<>,;'{}[]|" & quote
		set theString to inputString as string
		repeat with theChar in charsToEscape
			if theString contains theChar then
				--replace every occurence of the character with the escaped version
				set AppleScript's text item delimiters to theChar
				set theList to every text item of theString
				set AppleScript's text item delimiters to "\\" & theChar
				set theString to theList as text
			end if
		end repeat
	end try
	set AppleScript's text item delimiters to TID
	return theString
end tEsc- Apple stopped including the "enscript" command-line utility with Mac OS X sometime after Snow Leopard. I'm not sure which Mac OS X version was the last to include it. For more current versions, you'll need to download the "enscript" source code and build it yourself, or locate a pre-built binary. I have used MacPorts successfully on several Macs running Mavericks with no issues.
- Image Events can only crop images in the center; as such, I had to use a large left margin and a small font size in the PDF so as to offset the text such that it was centered horizontally on the PDF "page". It took a fair bit of fiddling with margins, fonts, and font sizes to get the results I was after, but it was worth it.